个人博客第8篇——优化主题
给博客进行一些美化
目录:
- 设置菜单
- 设置建站时间
- 设置头像
- 网站图标设置
- 设置动态背景
- 设置背景图片
- 主页文章添加阴影效果
- 添加顶部加载条
- 设置预览摘要
- 设置侧边栏显示效果
- 侧边栏推荐阅读
- 添加社交链接
- 设置博文内链接为蓝色
- 显示文章字数和阅读时长
- 显示站点文章总字数(另一种统计站点总字数的方法)
- 设置文章末尾”本文结束”标记
- 文章末尾添加版权说明
- 添加访问量统计
- 添加评论功能
- 添加Fork me on Github
- 安装Markdown编译器
- 安装RSS插件
- 项目主页添加README
- 忽略要编译的文件
- 代码块样式自定义
- 支持mathjax公式
- 图床网站
- 本地搜索
- Hexo博客提交百度和Google收录
- 博文置顶
- 添加打赏
- 添加分享(未完成)
- 图片可点击放大查看,放大后可关闭(fancybox可能有点问题,暂时未实现)
1. 设置菜单
打开主题配置文件即themes/next下的_config.yml,查找menu,将前面的#删除就行了:
1 | menu: |
“||”前面的是目标链接,后面的是图标名称,next使用的图标全是图标库 - Font Awesome 中文网这一网站的,有想用的图标直接在fontawesome上面找图标的名称就行。resources是我自己添加的。
新添加的菜单需要翻译对应的中文,打开theme/next/languages/zh-CN.yml,在menu下设置:
1 | menu: |
在根目录下打开Git Bash,输入如下代码:
1 | hexo new page "categories" |
此时在根目录的sources文件夹下会生成categories、tags、about、resources四个文件,每个文件中有一个index.md文件,修改内容分别如下:
1 | --- |
注:如果有启用评论,默认页面带有评论。需要关闭的话,添加字段comments并将值设置为false。
2. 设置建站时间
打开主题配置文件即themes/next下的_config.yml,查找since:
1 | footer: |
3. 设置头像
打开主题配置文件即themes/next下的_config.yml,查找avatar,url后是图片的链接地址:
1 | # Sidebar Avatar |
然后将你要的头像图片复制到themes/next/source/images里,重命名为avatar.png。
4. 网站图标设置
我是在这个网站找的图标,免费的图标素材网站:Easyicon
下载16x16和32x32的图标后,打开主题配置文件,查找favicon,只要修改small和medium为你的图标路径:
1 | favicon: |
5. 设置动态背景
5.1 canvas nest 风格
效果图:
在themes/next目录下打开Git Bash,输入:
1 | git clone https://github.com/theme-next/theme-next-canvas-nest source/lib/canvas-nest |
打开主题配置文件即themes/next下的_config.yml,找到canvas-nest,将enable:false改为true:(如果找不到canvas-nest,可能是文件修改了,试试将下面的代码复制粘贴到themes/next中)
1 | # Canvas-nest |
5.2 JavaScript 3D library风格
在themes/next目录下打开Git Bash,输入:
1 | git clone https://github.com/theme-next/theme-next-three source/lib/three |
打开主题配置文件即themes/next下的_config.yml,找到three,这里有三种风格,可以试一下看看喜欢哪种风格,直接将false改为true就行了,我已经选了canvas-nest,就没有选这种风格:
1 | # JavaScript 3D library. |
6. 设置背景图片
打开主题配置文件即themes/next下的_config.yml,将 style: source/_data/styles.styl 取消注释:
1 | custom_file_path: |
打开根目录Blog/source创建文件_data/styles.styl,添加以下内容:
1 | // 添加背景图片 |
7. 主页文章添加阴影效果
打开themes/next/source/css/_common/conponents/post/post.styl,修改.post-block,如下:
1 | .use-motion { |
还有一种方法打开Blog/source/_date/style.styl文件,添加以下代码:
1 | // 主页文章添加阴影效果 |
8. 添加顶部加载条
在themes/next目录下打开Git Bash,输入:
1 | git clone https://github.com/theme-next/theme-next-pace source/lib/pace |
打开主题配置文件即themes/next下的_config.yml,找到pace,将enable:false改为true,你还可以选择类型(theme):
1 | pace: |
9. 设置预览摘要
next(v7.7.1)已经没有如下代码:
1 | auto_excerpt: |
所以不需要设置,只要我们在文章中插入 ,该标签之上的是摘要,之后的内容不可见,需点击全文阅读按钮:
1 | <!-- more --> |
10. 设置侧边栏显示效果
打开主题配置文件即themes/next下的_config.yml,找到Sidebar Settings,设置:
1 | sidebar: |
11. 侧边栏推荐阅读
打开主题配置文件即themes/next下的_config.yml,搜索links(里面写你想要的链接):
1 | links_settings: |
12. 添加社交链接
打开主题配置文件即themes/next下的_config.yml,搜索social:
1 | social: |
“||”前面的是链接,后面的是 FontAwesome图标名称。
13. 设置博文内链接为蓝色
打开themes/next/source/css/_common/components/post/post.styl文件,将下面的代码复制到文件最后:
1 | .post-body p a{ |
重新部署一下后,效果如下图:
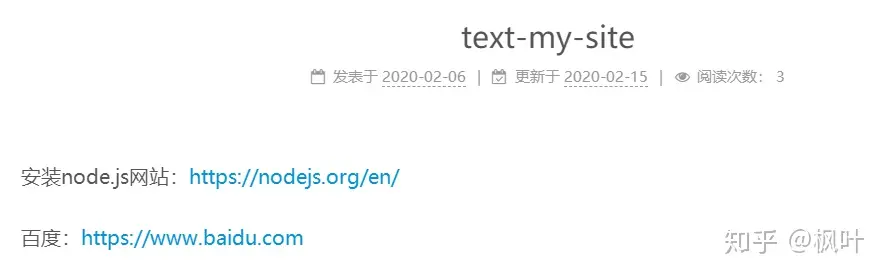
14. 显示文章字数和阅读时长
从根目录Blog打开Git Bash,执行下面的命令,安装插件:
1 | npm install hexo-wordcount --save |
然后打开站点配置文件,在文件末尾加上下面的代码:
1 | symbols_count_time: |
效果如下图:
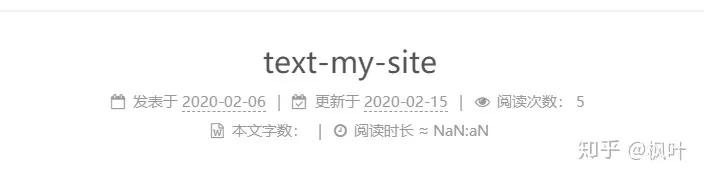
15. 显示站点文章总字数(另一种统计站点总字数的方法)
从根目录Blog打开Git Bash,执行下面的命令,安装插件:
1 | npm install hexo-wordcount --save |
然后在/themes/next/layout/_partials/footer.swig文件尾部加上:
1 | <div class="theme-info"> |
16. 设置文章末尾”本文结束”标记
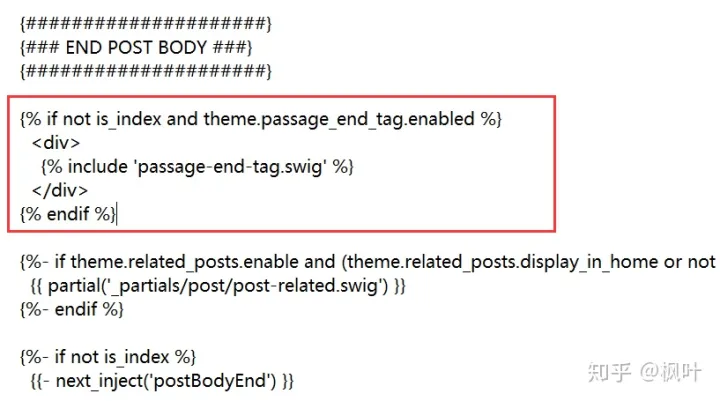
在路径/themes/next/layout/_macro 中新建 passage-end-tag.swig 文件,并添加以下内容:
1 | <div> |
接着打开/themes/next/layout/_macro/post.swig文件,在post-footer前添加代码:
1 | {% if not is_index and theme.passage_end_tag.enabled %} |
具体位置如下图:
然后打开主题配置文件(_config.yml),在末尾添加:
1 | # 文章末尾添加“本文结束”标记 |
完成以上设置之后,在每篇文章之后都会添加如下效果图的样子:

17. 文章末尾添加版权说明
查找主题配置文件themes/next/_config.yml中的creative_commons:
1 | creative_commons: |
效果图:

18. 添加访问量统计
打开主题配置文件即themes/next下的_config.yml,找到busuanzi_count,改为true:
1 | busuanzi_count: |
打开/themes/next/layout/_partials/footer.swig,在最后添加如下内容:
1 | {% if theme.busuanzi_count.enable %} |
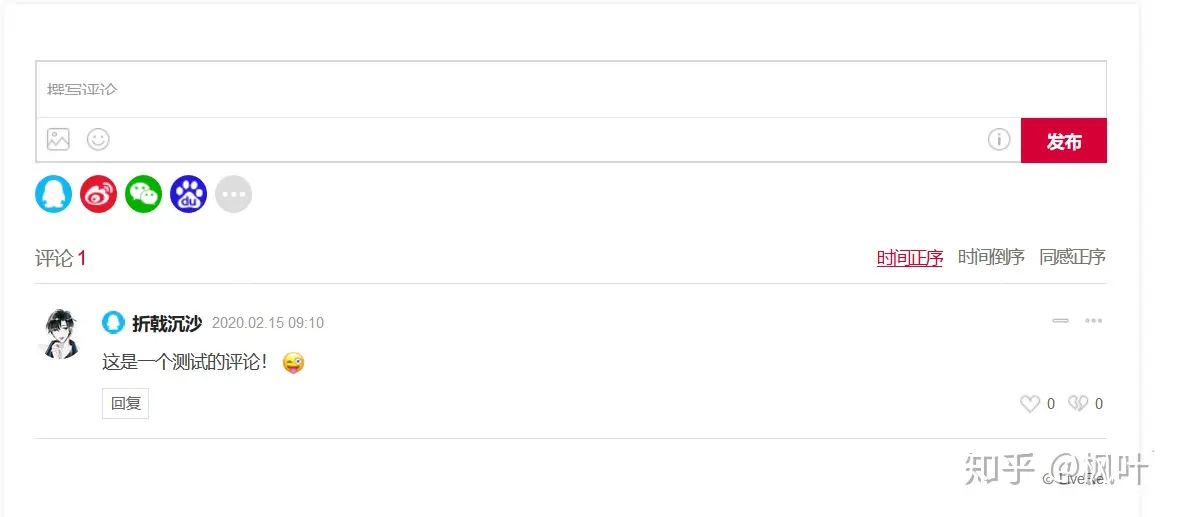
19. 添加评论功能
19.1 注册安装
我采用的是来必力,具体过程很简单,打开官网:Welcome to LiveRe.com
注册账号:
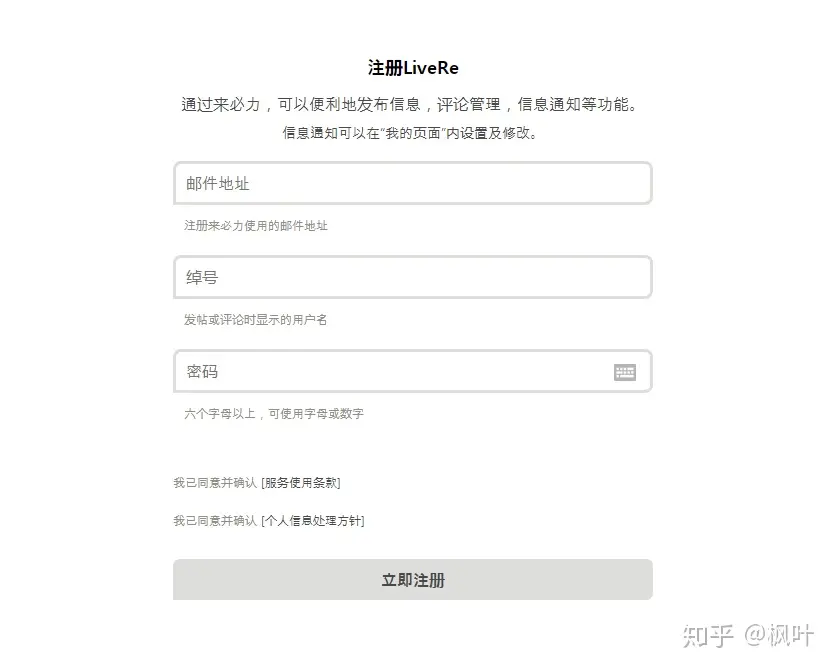
然后发送邮箱验证码,输入验证码验证,完成注册后点击上方安装:
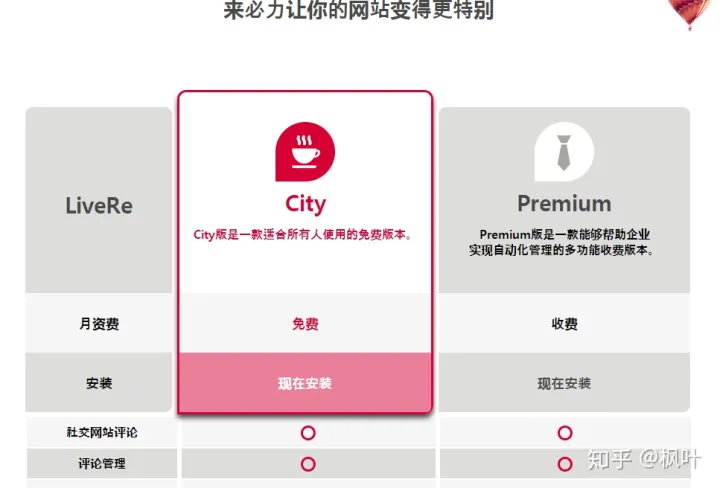
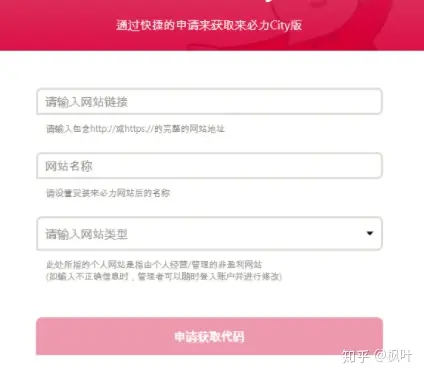
选择免费的现在安装,会弹出一个框让你填网站的信息:
然后获取代码:
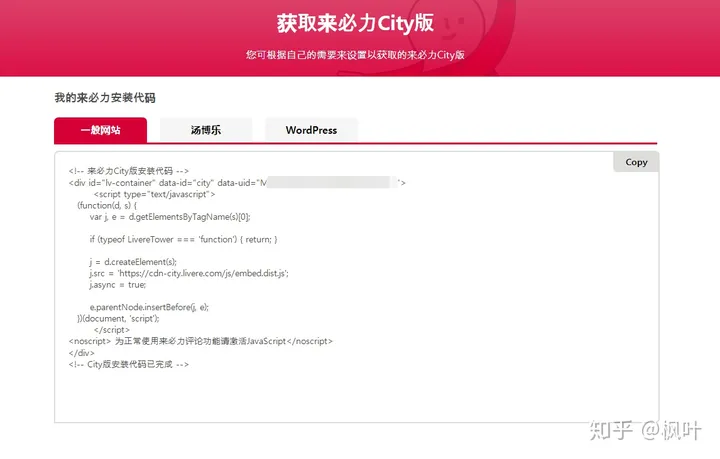
将data-uid后的代码复制,然后打开主题配置文件_config.yml,找到livere_uid,将代码复制到其后即可:
1 | livere_uid: "你的代码" |
19.2 设置提醒
当有新评论出现时,通过邮箱提醒,点击右上角->管理页面->评论提醒:
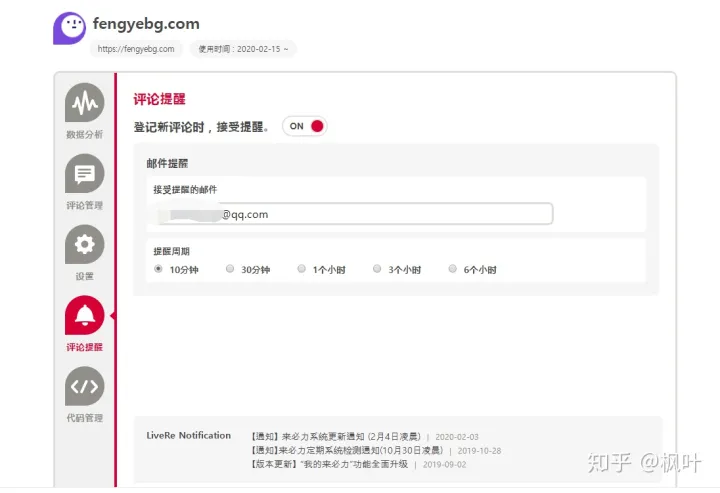
完成后效果如图:
20. 添加Fork me on Github
有两种,分别是:
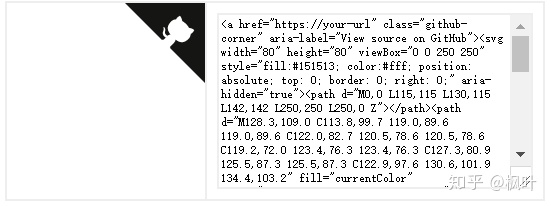
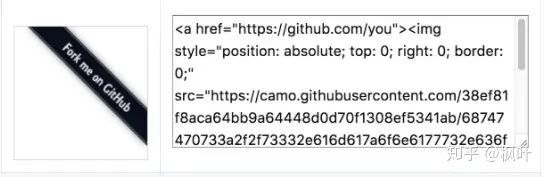
选择你喜欢的类型,打开小猫或者字,复制代码添加到themes/next/layout/_layout.swig文件中,放在
后面:1 | <div class="headband"></div> |
21. 安装Markdown编译器
可以看这篇文章然后选一个适合的文本编译器:几款主流好用的markdown编辑器介绍
我是用的Windows系统,所以我用的是MarkdownPad2,下载地址:The Markdown Editor for Windows,默认安装就行
如果是win10系统还需要安装一个组件 awesomium_v1.6.6_sdk_win,下载链接:链接:https://pan.baidu.com/s/1UJRtOBF8vj19ikOq4452sQ 提取码:yd8k
下载完awesomium_v1.6.6_sdk_win默认安装就行
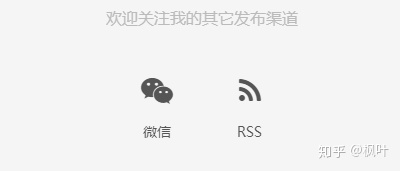
22. 安装RSS插件
为什么要安装RSS插件呢?不了解的可以看看这篇文章:rss订阅是什么意思?为什么要使用RSS?简单来说,RSS是一种协议,允许网站将其内容或其部分内容提供给其他网站或应用程序。通过使用RSS,可以节省宝贵的时间,并将各个站点提供的新闻和信息组织到一个中心点进行查看,也可以通过从使用RSS联合其内容的其他站点导入新闻来向你的站点添加新闻。
(1)安装hexo-generator-feed插件
RSS需要有一个Feed链接,而这个链接需要靠hexo-generator-feed插件来生成,所以第一步需要添加插件,在Blog根目录打开Git Bash执行安装指令:
1 | npm install hexo-generator-feed --save |
(2)配置feed信息
在站点配置文件末尾加上如下代码:
1 | feed: |
(3)配置rss
打开主题配置文件,搜索rss,将前面的#去掉:
1 | follow_me: |
效果如图:
23. 项目主页添加README
在建立Github上建立自己的博客仓库的时候,没有生成README文件,这样使得其他人无法知道我们这个仓库是做什么,即我们的这个仓库缺少一个说明文件;但是如果直接使用命令hexo n README,再部署至远程的时候,hexo会将它解析为html文件,这不是我们想要的。
因此,解决方式是在路径Blog\source下手动新建README.md注意这里的后缀是.mdown,Mardownpad2可以将文件保存为.mdown后缀文件;然后再在这个新建文件中写README即可。再之后hexo g会把它复制到public文件夹,而不会被解析成html文件,发布在博客中。
也可以参考第24项,在根目录Blog/source 目录下添加一个 README.md 文件,修改站点配置文件 _config.yml ,将 skip_render 参数的值设置为:
1 | skip_render: README.md |
24. 忽略要编译的文件
搜索引擎确认网站所有权时往往会提供一个html文件来进行验证,要是这个文件被渲染了,验证自然就会失败了。或者,有时候会有一些文件不希望Hexo渲染的,因此有必要针对某个文件或者目录进行排除。Hexo的配置文件中提供了配置项skip_render。只有source目录下的文件才会发布到public(能够在网络上访问到),因此Hexo只渲染source目录下的文件。skip_render参数设置的路径是相对于source目录的路径。
1 | skip_render: #部署时不包含的文件 |
25. 代码块样式自定义
打开根目录Blog/source/_data/styles.styl,添加以下内容:
1 | // Custom styles. |
效果图:
26. 支持mathjax公式
打开主题配置文件,搜索mathjax:
1 | mathjax: |
27. 图床网站
推荐七牛云,免费网站,快速,方便,或者可以看看这篇文章选一个合适的网站:软件小编:盘点一下免费好用的图床
网站:七牛云,后面我再写一篇关于如何注册使用七牛云存储图片的文章吧,我先研究研究。
28. 本地搜索
打开cmd安装插件:
1 | npm install hexo-generator-search |
查找主题配置文件themes/next/_config.yml中的local_search :
1 | local_search: |
29. Hexo博客提交百度和Google收录
这篇文章写得很详细:Hexo博客提交百度和Google收录
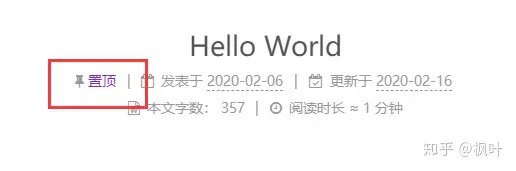
30. 博文置顶
(1)安装插件
在根目录Blog打开Git Bash,执行下面的命令:
1 | npm uninstall hexo-generator-index --save |
(2)设置置顶标志
打开blog/themes/next/layout/_macro目录下的post.swig文件,定位到
1 | {% if post.top %} |
(3)在文章中添加top
然后在需要置顶的文章的Front-matter中加上top: true即可,如下:
1 | --- |
效果如图:
31. 添加打赏
next(v7.7.1)已经有打赏功能,只要准备好微信和支付宝二维码,具体操作:制作微信二维码收款,很简单我就不详细说了。
打开主题配置文件,查找reward:
1 | reward_settings: |
将制作好的二维码图片放入themes/next/source/images文件里,并命名为wechatpay.png和alipay.png。
32. 添加分享(未完成)
原来的 jiathis share 和 baidushare 已经没有了,现在的是 addthis,但是我注册不了addthis账号 AddThis官网
不知道什么原因,我用Firefox不行,下次用Chrome试试,先放着吧!
33. 图片可点击放大查看,放大后可关闭(fancybox可能有点问题,暂时未实现)
打开主题配置文件_config.yml,搜索fancybox,设置其值为true:
1 | fancybox: true |
进入到theme/next文件夹下,打开Git Bash,输入如下代码:
1 | git clone theme-next/theme-next-fancybox3 source/lib/fancybox |
主要参考文献:
转自从零开始搭建个人博客(超详细) - 知乎 (zhihu.com)
源自于 2020-09-13 22:16